Welcome back! In part 1 I provided an overview of options for copying or moving S3 objects between AWS accounts. I will continue now by discussing my recomendation as to the best option, and then showing all the steps required to copy or move S3 objects.
My Recommendation
So my decision was to go with the AWS S3 CLI tool! Dealing with AWS I found that most of the time Amazon has the best solutions and tools to deal with the AWS environment.
Using the AWS S3 CLI Tool
So here are the ingredients for this recipe again as discussed in part 1:
- 2 - S3 buckets (one for each AWS account)
- 1 - IAM User - Most AWS accounts already may have a few users
- 1 - User policy for the IAM user who is going to do the copy/move.
- 1 - Bucket policy
- 1 - ASW S3 CLI tool - which comes already installed on the EC2 instance
- 1 - EC2 Linux instance, which you most probably already have and if not it is just a few clicks to start a micro instance.
Here are the steps we need to take to get all these ingredients to work together in perfect harmony:
- Create/Identify Buckets
- Create IAM user account
- Setup user credentials
- Create a User Policy
- Create Bucket Policy
- Verify AWS S3 CLI availability on EC2 instance
- Configure S3 CLI credentials
- Finally copy and move some S3 objects
Create or Identify the Buckets
Let's give the two buckets names. We will call the one bucket from-source, which belongs to the Source AWS account and will be the bucket we are going to copy from and the other bucket to-destination, which belongs to the Destination AWS account and is where we are going to copy/move the objects to.
Create IAM user account
If you do not already have an IAM user account, then create an IAM user within the Destination AWS account that you want to copy/move the data too (see Creating an IAM User in Your AWS Account ). This user does not have to have a password but only access keys. For this blog I will be referring to the user copy_user as the IAM user that will perform all S3 operations.
Setup User Credentials
If the IAM user does not have access keys, you must create access keys for the account. You can retrieve the access key ID from the Security Credentials page, but you cannot retrieve the secret access key. If the secret access key is lost or forgotten, you need to create new access keys. You can create new access keys for the account by going to the Security Credentials page.
Create a User Policy
To be able to perform S3 bucket operations we need to give the copy_user some permissions.
(see screen shot below - Image 1.)

Image 1
To do so go to the Destination AWS account under the IAM service, then select users and then select the user that will be used to do the copy/move operations. On the user page select the Attach User Policy button (see above - Image 1.) and enter the following policy:
{
  "Version": "2012-10-17",
  "Statement": [
     {
         "Effect":"Allow",
         "Action":[
            "s3:ListAllMyBuckets"
         ],
         "Resource":"arn:aws:s3:::*"
      },
      {
         "Effect":"Allow",
         "Action":[

              "s3:GetObject"
              ],
         "Resource":[

              "arn:aws:s3:::to-destination/*"
              ]
      },
    {
      "Effect": "Allow",
      "Action": [
            "s3:ListBucket",
            "s3:GetBucketLocation"
         	],
      "Resource": [
              "arn:aws:s3:::to-destination"

    		]
    }

  ]
}
User Policy
In this User Policy we give the user the follow permissions:
- ListAllMyBuckets - the ability to list all available S3 buckets
- GetObject - the ability the get an S3 object
- ListBucket - the ability to list all the objects for the given bucket (in this case the
to-destinationbucket) - GetBucketLocation - the ability to get the location of the bucket which is needed before any operations can be performed on a bucket.
- We finally gave the user policy the name
bucket_copy_move_policy,
Create a Bucket Policy
At this point the user has the right to perform some S3 operations but do not really have permission to access the objects within the from-source bucket yet. The reason is because the from-source bucket do not belong to the Destination AWS account but to the Source AWS Account. So we need to allow the user to get an object in the from-source bucket, by giving him permission via the from-source bucket policy, beloning to the Source AWS Account.
To do this we make use of a Bucket Policy. Look at how to add a bucket policy.
Amazon have some good documentation explaining How Amazon S3 Authorizes a Request for a Bucket Operation and how the permission validation works during a typical S3 object request, but for now lets get practical. If you just want to copy/move objects then past the bucket policy below into your bucket's policy.
{
        "Version": "2012-10-17",
        "Statement": [
            {
                "Sid": "AllowAll",
                "Effect": "Allow",
                "Principal": {
                    "AWS": ["arn:aws:iam::111122223333:user/copy_user"]
                },
                "Action": [
                    "s3:*"
                ],
                "Resource": [

                    "arn:aws:s3:::from-source",
                    "arn:aws:s3:::from-source/*"
                ]
            }
        ]
 }
Bucket Policy
To do this you need to log into the Source AWS account, then go to the S3 service. Inside the S3 console select the from-source bucket and click on the Properties button and then select the Permissions section (See Image 2 below).

Image 2
Click on the Add bucket policy button and past the bucket policy given above. After pasting the bucket policy click on the Save button as shown in image 3 below.
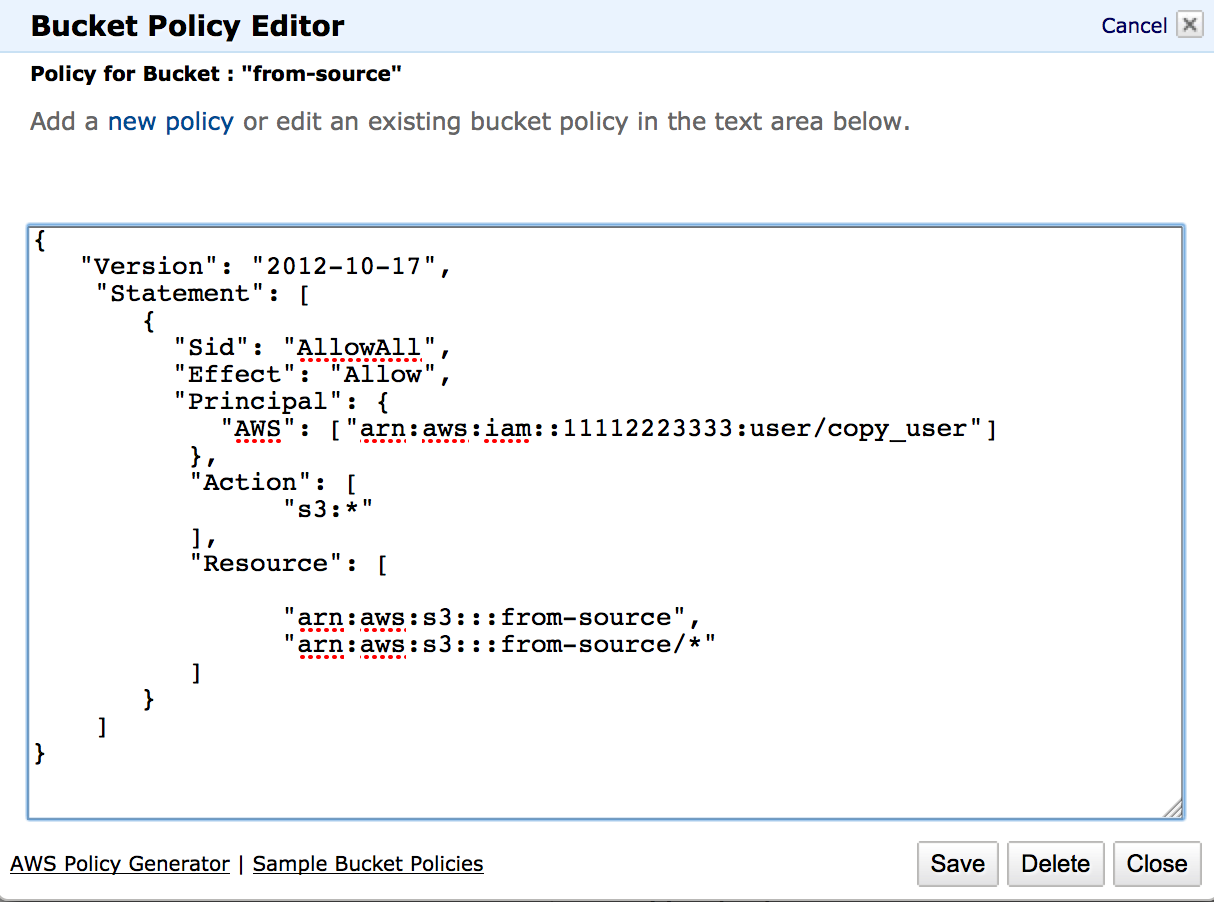
Image 3
If you want you can use the AWS Policy Generator to construct a bucket policy or any other policy type. You can also see a formal description of each element that is used in this bucket policy.
So here is a quick explanation of the Bucket Policy:
- Effect - Will allow the following actions to the given principal
- Principal - This refers to the user, account, service, or other entity that is allowed access. In this case the IAM user
copy_user. The value for Principal is the Amazon Resource Name given to the copy_user. If we want to allow everybody you can replace this line with:"Principal": "*"
This information can be found in the same place we went to add the user policy in the IAM Service under Users, select usercopy_user, then on the top of the page, under the Summary heading next to theUser ARN:label. - Action - This refers to the S3 actions that are allowed on this bucket, I gave it
"s3:*", which means all actions. If you just want to give it read access (get objects) you can replace this line with"s3:GetObject"
Also remember to add"s3:DeleteObject"
if you want to do a move. - Resource - Here I specified the
from-sourcebucket name AND all its content.
At this point all the setup-work so far would have had to be done for all other tools or solutions since this is the fundamental way AWS is granting permissions to resources in S3.
Verify AWS S3 CLI availability on EC2 instance
This is were we deviate from other solutions and move to the world of AWS S3 CLI. Now ssh to your EC2 instance (Destination AWS account), e.g.
ssh -l ec2-user -i /path_to/AWS_KEYS.pem ec2-00-00-00-000.compute-1.amazonaws.com
Look at Connecting to Your Linux Instance Using SSH for more details on how to ssh to an EC2 instance.
Now on the command line enter:
aws s3
You should get back something like the following:
   usage: aws [options] command subcommand [parameters]
   aws: error: too few arguments
This will confirm that the AWS S3 CLI tool is installled and available. Like I said before you do not have to install the tool since it already comes with the AWS EC2 Linux instance.
Configure S3 CLI credentials
Now to be able to use the S3 CLI tool we need to configure it first to use the credentials of the IAM user of the Destination AWS account. The AWS CLI stores the credentials it will use in the file ~/.aws/credentials. If this is already setup for the copy_user skip to the next step. It is important to note that this might be already configured but for a different user account. You have to set the credentials to be that of the user you have setup the User policy for above in step four. Execute the following command and enter the user credentials, first the access key and then the secret key. The region must be that of the region of the user account, if you do not know this just hit enter by excepting the default. You can also except the default for the last option output format and hit enter:
   $ aws configure
   AWS Access Key ID [None]: AKIAI44QH8DHBEXAMPLE
   AWS Secret Access Key [None]: je7MtGbClwBF/2Zp9Utk/h3yCo8nvbEXAMPLEKEY
   Default region name [None]: us-east-1
   Default output format [None]: text
Finally we are ready to execute some AWS S3 CLI commands. Lets see if we can show a total count of the objects in our from-source bucket Execute the following command:
aws s3 ls s3://from-source | wc -lor if the count is not to high or you do not mind getting a lot of file names scrolling over the screen you can do
aws s3 ls s3://from-sourceCongrats! You have access to the
from-source bucket You can also try to copy say one file down to a local folder on your EC2 instance e.g.::
aws s3 cp s3://from-source/filename.txt" .
Detailed documentation regarding S3 CLI can be found at AWS S3 CLI Documentation
Finally copy and move some S3 objects!
Now to be able to allow our user copy_user to write to our to-destination S3 bucket we need to give him more user and bucket permissions to allow "writing" to the to-destination bucket. Again you can refer to How Amazon S3 Authorizes a Request for a Bucket Operation for a good explaining.
You have seen now that dealing with S3 buckets we have to give the user permission to perform certain actions and at the same time give the user access to the S3 bucket. So again we will have to modify the user policy, but we do not have to create a new bucket policy for the to-destination S3 bucket. The reason is that the to-destination bucket is within the same AWS account as our IAM user and thus we do not have to give explicit permissions on the bucket itself. However it would be good to go and check if there are not any bucket policies on our destination bucket that might conflict with our user policy. If there is, just remove it temporary until you completed the copy/move of objects. Just make sure that if it is a production environment you make these changes during a scheduled maintenance window.
To allow writing to a bucket we will add the "s3:PutObject" Action to our user policy. Since the destination bucket name is different we will have to add it to our list of resources as well.
So here is the modified user policy.
{
  "Version": "2012-10-17",
  "Statement": [
      {
         "Effect":"Allow",
         "Action":[
            "s3:ListAllMyBuckets"
         ],
         "Resource":"arn:aws:s3:::*"
      },
      {
         "Effect":"Allow",
         "Action":[

                  "s3:GetObject",
                  "s3:PutObject"

              ],
         "Resource":[

                  "arn:aws:s3:::from-source/*",
                  "arn:aws:s3:::to-destination/*"
              ]
      },
      {
         "Effect": "Allow",
         "Action": [
                 "s3:ListBucket",
                 "s3:GetBucketLocation"
         	],
         "Resource": [
                   "arn:aws:s3:::from-source",
                   "arn:aws:s3:::to-destination"

    	      ]
      }

  ]
}
Updated User Policy
The only changes in the user policy was the adding of the "s3:PutObject" Action and another resource for the to-destination bucket.
Now lets see if you can list content in the to-destination bucket by executing the following command:
aws s3 ls s3://to-destination | wc -lor, if the count is not to high, or you do not mind getting a lot of file names scrolling over the screen you can do:
aws s3 ls s3://to-destinationFinally we get to the point where you want to copy or move directly from one bucket to the other:
aws s3 cp s3://from-source/ s3://to-destination/ --recursiveWe use the --recursive flag to indicate that ALL files must be copied recursively.
The following are more useful options that might interest you. Here we copy only pdf files by excluding all .xml files and including only .pdf files:
aws s3 cp s3://from-source/ s3://to-destination/ --recursive --exclude "*.xml" --include "*.pdf"Here we copy all the objects in the
from-source bucket to a current local folder on the current machine:
aws s3 cp s3://from-source . --recursiveHere we copy everything except a folder
another:aws s3 cp s3://from-source/ s3://to-destination/ --recursive --exclude "from-source/another/*"If you wanted to include both .jpg files as well as .txt files and nothing else, you can run:
aws s3 cp s3://from-source/ s3://to-destination/ --recursive --exclude "*" --include "*.jpg" --include "*.txt"To move an object you can use:
aws s3 mv s3://from-source/ s3://to-destination/ --recursiveor
aws s3 mv s3://from-source/file1.txt s3://to-destination/file2.txt
Conclusion
I hope you found this post helpful, and that you can use this information to get results quickly. At the same time, now that you know how to move and copy some files, you can start to use other CLI utilities like sync, rm, ls, mb and website. Here is a good link if you want to read up a bit more about Delegating Cross-Account Permissions to IAM Users.
Feel free to reach out with any questions and we will be happy to help. If you are looking for AWS consulting services, please contact us to schedule a complimentary consultation.